Category Archives: Home Improvement

How I Created A Nursery That’s A Jungle Of Fun-#MagicBabyMoments


This shop has been compensated by Collective Bias, Inc. and its advertiser. All opinions are mine alone.
#MagicBabyMoments #CollectiveBias

#MagicBabyMoments Collage

Living on a lake in a resort town, we do a lot of entertaining, especially in the summer. When you factor that we have 2 large homes on this lake, we get our share of company. Having five kids, we have loads of baby and kid gear,  so if someone forgets any baby gear or accessories, we have extras.  We decided it would be a good idea to help our guests out and make things as easy as possible when traveling with baby. We have a large home with many bedrooms so we thought about creating a nursery in one of the guest spaces.

The youngest 2 of our five kids were super close in age and both in cribs at the same time, so we had all the major pieces.  We decided to set up a crib and create a nursery space that will be a welcome relief to our visiting family with babies and toddlers.  We think it will be a huge relief to them  not having to stuff more oversized baby gear in their car or van when visiting.

I was in Walmart the other day and saw their Disney Baby bedding collection.  It was literally flying off the shelves it was so popular.  I spoke with an associate who told me that was why it seemed sparse.  I was lucky to find an adorable Disney Baby Lion King Jungle Fun, 3 Piece Bedding Set that would look great and was unisex. The set has accents of tan, aqua, ivory, green and brown that give me lots of decorating and painting options.

lion king in store aisle

I also picked up a coordinating super soft plush Disney Baby Lion King Jungle Fun Plush Blanket and Knit Beanie. The 3 piece crib set includes a dust ruffle, crib sheet and comforter.  Everything is affordably priced and perfect for a brand new nursery or as an easy way to update an existing one.

lion king collage in store

Heading home I could not wait to deck out the crib with the new bedding.  I was impressed with the quality of the set. For such a small price, I didn’t expect it to be so nice. What a pleasant surprise to unpack the items and find the great quality. The darling appliqued comforter is a large 42″ by 33″, the fabric is a 100% polyester microfiber that feels great. The three pieces are easy to care for and are machine washable and dryable. The comforter is so nice and has one cub with a velvety feel that little ones will just love.

lion king crib idea

Lion King Bedding

lion king bedding back

The coordinating Lion King plush blanket is super soft and comes with a knit beanie with cute playful ears in a golden shade of yellow great for boys or girls.  The blanket is 30″ by 40″ and is machine washable and dryable for easy care which I love.  It will be easy to freshen the bedding between our little guests.

Lion King blanket cap

Lion king crib

Lion King Dust Ruffle

Lion King blanket Sheet Crib Bedding Disney

Lion King Nursery 3

I am in the process of going through and adding all the Lion King accents we have like the Pumba and Timon.  I have all of the characters in plush, even figurines. I am going to add to a cute little shelf I just painted aqua and will hang on the wall.  I still have a lot I want to do like paint the walls a shade of green and bring the changing table in too! I am a perfectionist so I want everything perfect but decided to just get going and get the biggest piece in and work around that.  I will update when it’s all finished.

Lion King Nursery

.

Lion King Nursery 1

 I think the Disney Baby Lion King Jungle Fun 3 Piece Crib Bedding  Set and blanket with cap make an adorable theme for this new guest nursery.  What do you think?  Would love to hear your thoughts in the comments


8 Comments

Filed under Baby, Baby Gear, Disney, DIY, Family, Family Fun, Home, Home & Garden, Home Improvement, Shoppertunity

DIY Storage Made From 2 by 4’s To Hold Our Sadness & Anger-#InsideOutEmotions

This shop has been compensated by Collective Bias, Inc. and its advertiser. All opinions are mine alone. #InsideOutEmotions #CollectiveBias


diy storage bin from 2 by 4'sI think one of the biggest things we underestimate before we are parents, is the amount of “stuff” kids seem to need. From the nursery through childhood it seems that the “stuff” multiplies before our eyes. The gear, toys, clothing and more that seem to fill every corner of our home can sometimes seem overwhelming.

Finding a way to corral all the stuff seems to be a never-ending battle.  I find the hardest part is the balance between functional and aesthetically pleasing. Plastic bins and totes always look messy and like we are packing all the time.  They are good for putting things away in the basement or attic but not as long-term storage solutions.

Recently I was in Walmart and saw the display of plush characters from the new Disney Pixar movie Inside Out. If you are not aware of the movie, the characters represent the feelings and emotions we all carry inside. The 5 personified emotions in the movie are also plush characters called  Sadness, Anger, Joy, Fear and Disgust. I picked up Sadness and Anger and I have to admit it gave me more than a chuckle to say, “I went to Walmart and left with Sadness and Anger.”

disney pixar inside out  Collage


I think the characters are great and are a super springboard for kids to talk about their emotions with themselves, their parents, teachers or therapists. I frankly think they are even a good way for anyone to discuss their feelings. I was talking about it with some good friends and coworkers earlier today. We all thought if there should be a bin full of these plush emotions in every office.  Then everyone could take what they were feeling out and sit down at a conference table to discuss and hash out some tension.

The characters are huggable and soft but I could not help while holding sadness to think it could be said I had to let my sadness go. The same could be said of anger or fear. It was very humorous but  I think for children it is a very good way to discuss feelings and emotions in a constructive way.  I know my children enjoyed holding the plush characters and talking about the emotions and how they felt. Even very young children who cannot fully articulate or express their emotions would benefit engaging with the characters because it would be a very visual representation of their feelings.

Back to storage, now that 2 new plush characters have moved home with us, and I am sure the other 3 will soon  follow, I wanted to find a way to contain our emotions.  Sorry I could not resist that! I needed to find a storage solution that was good for all of my kid’s plush toys.

I found some plans on-line that looked really cool.  They were storage boxes made from 2 by 4s that were sturdy, had wheels and a handle.  The boxes would not be outgrown and literally could follow your child to college and beyond. I thought that the 2 by 4’s could be stained or painted and immediately got my husband involved.  s

We went out and bought ten 2 by 4’s, screws, pulls and casters.  We had wood glue and our tools so we headed home.  I stained the 2 by 4’s with a green water based stain. You will need to have a saw, drill, 4″ screws if you are not using a Kreg Jig and if you are you will need 2.5″ self tapping screws, wood filler, wood glue, 8 casters and 2 pulls. You will need to get six 10′ 2 by 4’s and two 8′ 2 by 4’s.

inside out Inside OUt 2 - Copy

Inside Out 3 - Copy

Inside OUt 4 - Copy

Inside Out 5 - Copy

Inside Out 6 - Copy

After the wood was stained and dry, it was time to make all the cuts we needed for the 2 boxes. We needed to cut the 2 by 4’s into the following lengths:

  • 8-16″ for legs
  • 12-14″ front/back
  • 12-18″ sides
  • 12-21″ bottom

Inside Out 7 - Copy

Inside Out 8 - Copy

Inside Out 10 - Copy

Inside OUt 11 - Copy

With all the pieces cut, we needed to assemble the boxes. You could use 4 inches screws to go through the 2 by 4’s or a Kreg Jig which makes it possible to screw through pocket holes.  The advantage of the Kreg Jig is that the screws are concealed and it creates the strongest joint. We chose to use the Kreg Jig to secure our boxes.

Inside Out Jig

Inside Out Jig 1

Inside out  jig 7 - Copy

Inside OUt Jig 2

Inside Out Jig 5

Inside out jig 4

INside OUt  8 - Copy


We used wood glue and screws to attach the pieces.

Inside OUt 18 - Copy

Inside Out 20 - Copy


Inside out 21 - Copy

Inside Out 22 - Copy

Inside Out 24 - Copy

Inside OUt 16 - Copy

Inside Out 23 - Copy

Inside Out 26


After all the sides are built and assembled you are ready to build the bottom.  Take the 6 pieces and glue and screw to secure.

Inside OUt 28

Inside OUt 27

Inside OUt 29


Attach the caster wheels. We are changing these wheels to something more heavy duty since the boxes can hold so much weight, we want stronger than a 50 lb limit on them. You never know what our son will put in these boxes in the future.

Inside out 30

Then I touched up all the stain.  I am going to put 2 coats of poly on but did not have the time yet.

Inside out 32

I will update when I have coated them with poly and when  we have the second box built and finished.  We are going to move them to the bottom of our son’s closet. He has a large closet with double doors and these 2 boxes are going on the bottom and will fit very nicely. We added the handle and then filled with some plush friends including Anger and Sadness.

Inside OUt 33

Inside Out Anger Sadness

Inside out 36

Inside OUt 35


So now we have a box to put our Anger and Sadness in and I know that soon we will be putting Joy, Fear and Disgust in too. Have you see Inside Out?  Let me know if you did and how you liked it.  If you decide to make these storage boxes let me know how they turn out, or if you have any questions. I hope you do, then you can contain your emotions too!


2 Comments

Filed under DIY, Home, Home Improvement

SteamMachine Plus Is The Answer For Chemical Free Spring Cleaning & We’re Giving One Away!

Anyone that knows me, knows I don’t use products with toxic chemicals. They also know I am a germophobe.  You may be wondering how I clean.  Well, I use a great line of cleaning products that are made with powerful plant based solvents and non-toxic ingredients but I also rely heavily on something else.  Steam, the power of STEAM!

HomeRight SteamMachine Collage


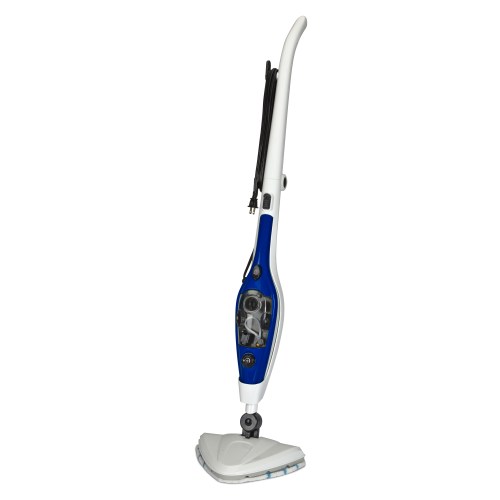
I love my full size HomeRight SteamMachine and so when I had the chance to try out the SteamMachine Plus from HomeRight, I was super excited.  It’s so perfect because it has a portable steam cleaner built right into the mop.  So you have everything you need to clean and sanitize your home in a very portable package.

C800949 SteamMachine Plus web_0

So let me tell you about this powerhouse of steam cleaning greatness.  This Steam Mop is my  go to for daily cleaning jobs of all kinds and lets me see sparkling results in less time.  The detachable hand-held steamer is what really sets this mop apart from other steam mops.  Literally at your fingertips you have everything you need to clean from floor to ceiling.  Homerite Steam Pro Mop Pic

HormRight Steam Pro Mop Portable Steamer

Homright-SteamMachine-Plus-Cleaner


Homeright-Steam-Machine-Plus


HomeRight-Portable-Steam-Cleaner

6 useful attachments are included and you can use the portable steamer to clean and disinfect stoves, ovens, grills, counters, bathroom surfaces and so much more.  The steam is 205 degrees as it leaves the nozzle and kills 99.9% of germs and bacteria including e-coli, salmonella and staph germs.

Homeright Steam Cleaner Attachments

C800949 Steam Mop wAccessories

The convenient fold down handle makes it easy to store the mop in the closet or pantry.  The mop comes with 2 pads that attach to the triangular-shaped, swivel mop head.  The shape of the mop head along with the swivel make it easy to get into even tight spaces.

Homrite Steam Mop

Homerite Steam Pro  Mop

HomeRight-Steam-Mop-Plus

The steam trigger on the handle lets you get extra steam on demand for tough jobs.  You can use the mop on tile, laminate, hardwood and vinyl flooring and the carpet glider allows you to steam clean rugs.

Homerite Steam Pro Mop Attachment

HomeRight-Steam-Machine, Attachment-Cleaning

Homeright-SteamMachine-Plus-Shower Door

Homerie Steam Cleaner


Homeright Steam Cleaning

This mop heats up fast, just 30 seconds and you are good to go and can clean about 20 minutes on one tank of water.  The 16 foot cord lets you have enough mobility to clean a good size area without having to find another outlet or use an extension cord.

C800949 Steam Mop Handle

Included in Box:

  • Detachable Steamer
  • Steamer Frame
  • Mop Head
  • Carpet Glider
  • (2) Microfiber Mop Pads
  • Squeegee/Fabric Steamer
  • Cotton Bonnet for Squeegee/Fabric Steamer
  • Small Nylon Brush
  • Large Nylon Brush
  • Angled Jet Nozzle
  • Grout Brush
  • Scraper
  • Straight Adaptor
  • Measuring Cup


Specifications:

  • 205 degree F steam
  • 20 Minute Run Time
  • Heats Up in 30 Seconds
  • 12 Ounce Water Tank
  • 1500 Watts
  • 120 Volts
  • 16 Foot Cord
  • UL Safety Listed
HomeRight is sponsoring a giveaway on Mommy Ramblings!  One lucky blog reader will win their own HomeRight SteamMachine Plus Mop!  Thank you to HomeRight for the review product and for sponsoring this steaming giveaway on Mommy Ramblings!!!  Open to US residents.

HomeRight SteamMachine Plus Mop Giveaway on Mommy Ramblings Rules:

Please enter the giveaway using the Rafflecopter widget below.  Good Luck!!!

Continue reading


32 Comments

Filed under DIY, Giveaway, Health, Home, Home Improvement, Kitchen, Main Page Post, Mommy Ramblings, Natural, Review

Luma Comfort HC12B Humidifier Review-Give Dry Winter Air The Boot

Luma Comfort Logo

With winter weather comes dry air, dry skin and chapped lips.  This can make us very uncomfortable and even miserable.  If you get sick with the cold or flu  and have a cough, dry air in your home can have you losing sleep by exacerbating the issue and have you up coughing all night.  Dry winter air can cause stuffy sinuses, make allergies worse and lead to headaches.  We need to replace the moisture in the air.

I just went through this recently in my home.  I had a very bad bout with a sinus infection and then a cough that kept me up almost every night for over a week as a result.  I could literally feel my nasal passages and throat drying up while I was trying to sleep, my cough got worse and I woke up with a terrible sore throat and laryngitis.  I had to get some moisture in the air and fast.

Enter the Luma Comfort HC12B ultrasonic cool mist humidifier.  Now, this humidifier not only keeps the air moist and comfortable, it looks great!  Available in black or white it has a sleek and slim vase design that  just fits in with home decor.  Designed to cover rooms up tp 650 square feet make it perfect for medium and large rooms.

Luma Comfort Piano

This humidifier was so easy to get up and running right out of the box.

Luma-Comfort-Cool-Mist-Humidifier-HC12B


My husband filled the tank up, screwed the demineralization cartridge into the water tank cover and then screwed the cover on.

Luma Comfort fill

Luma Comfort Filter

Luma Comfort Assembly

You let sit it for a few minutes and then plug in.  You can use the attachments to create 3 different height settings so it will be the perfect height whether you place the unit on the floor or table.

Luma Comfort Assembly 1


Luma Comfortr Short


Luma Comfort med


Luma Comfort Tall

When you turn it on a musical chime will sound and that means the unit is in standby mode.  Press the power button and the unit will turn on at the lowest setting.  To increase the mist volume you just press and hold the power button and you will hear the musical tone which lets you know that it is increasing.  A visual changing of the light from blue to white will also signal that the mist volume is increasing toward the highest level.

Luma Comfort button

Luma Comfort mist


Decreasing the volume once it has reached the highest  setting is easy too. Press the power button, the musical chime will sound and the light will change from white to blue as it cycles back to the lowest setting.  If you find the ideal setting, the unit will remember and as long as it is not unplugged, will return to that setting when turned on.  Unplugging the unit returns it to the default settings.  The humidifier also comes with a matching remote control that operates the unit up to 65 feet away.  When the tank is low on water it will beep and if not filled the light on the front will blink red until the tank is filled.  On its lowest setting it will run for 45 continuous hours.This humidifier operates with a demineralization cartridge that lets you use any kind of water.  Distilled water will keep the unit running in peak condition longer and eliminate white dust.

I just love this humidifier!  From the first day I used this, I could feel a difference.  It helped me breath better, I didn’t  feel like my nasal passages were dry and my cough was so much better.  Since using it, I have not noticed the sinus pressure and pain that I suffered with for so long.  It truly does eliminate dust particles and the table I have it on usually shows dust like crazy but since placing the humidifier on it, there is no visible dust! I had the humidifier on its highest setting for these pictures because I really want to get rid of the dry air as quickly as possible.  Once the air quality was better I used it on a lower setting. If you are looking for something to improve the air quality in your home, take a look at the Luma Comfort HC12B ultrasonic cool mist humidifier.  I am certain that you will be breathing a lot easier if you do.


You can see more of the great Luma Comfort product line on their website and follow them on Facebook and  Twitter.


Luma Comfort final


Leave a Comment

Filed under Baby, Baby Gear, Health, Home, Home Improvement, Main Page Post, Mommy Ramblings, Review

Join Us For Peter Walsh’s 31 Days 2 Get Organized 2015!!! #31Days2GetOrganized

I am so excited!  I love Peter Walsh! He is such an inspiration for releasing the “stuff” that holds us back.  The other day I saw that he was asking us to recruit someone for  ‪#‎31Days2GetOrganized‬  for 2015!  I recruited a good friend,  then I thought more about it.  Why don’t we all do this?  I think it will be a lot of fun if we all come together and let go of things we are hanging on to that are truly weighing us down.  What a wonderful way to make a slow month like January much more fun and productive!  So I am recruiting all of you!  Please join me in the 31 Days 2 Get Organized with Peter Walsh.

If you have never heard of Peter Walsh and I can’t imagine anyone that hasn’t, but if you are in the dark about who he is and what he does, just click the video below to get to know him.


I want to make things really exciting so I created a closed Facebook group just for this.  The closed group means that even your most cluttered closet is safe with us and there will be no judging or negativity.  The link for the group is here and you can join now.  In the group you will post your before and afters of the 31, ten minute challenges Peter will dole out each day.  We can work to encourage and keep everyone accountable.  I hope you will all join in this with me.

Peter has a New Year Message for us here:

Peter Walsh please join our Facebook Group so you can see our progress.  Are you ready for the challenge?  I sure am!  Comment here and let me know you are up to the challenge and recruit someone to come along.

If you are chomping at the bit to get started you can work on this until Monday January 5th! I know you were so excited to start tomorrow but Peter says it officially starts on January 5th! Don’t worry take his advice and get your family and friends on board and in the meantime join the group and get aquainted. If you just can’t wait, you can get a head start on the challenge with Peter Walsh: 15 Declutter Projects for a Saner You.  Of course follow Peter on Facebook and YouTube so you don’t miss a thing!


Leave a Comment

Filed under Curb Appeal, DIY, Home, Home Improvement, Kitchen, Life Stages, Main Page Post, Mommy Ramblings

Make Choosing Tile Easier With The Interior Design Tile Style Guide From Drury Design!!!

As someone in the middle of several home improvement projects with extensive tile work involved in 2 of them, I am excited to share a new guide to make choosing tile easier.  One of the most daunting parts of picking out tile is trying to find what you like, staying in your  budget and choosing tile that is right for the application you are using it for.  Walking in a tile showroom can be positively overwhelming!  There are so many patterns, colors, materials and finishes that it may cause your eyes to glaze over or make you have a panic attack.

Tile ModernBath

Last year at this time, I was picking out the tile for our master bath and I remember being so overwhelmed.   I just wanted to be in a room with 3 choices and make a simple decision.  Tile is something you don’t just change on a whim, you know it’s going to be with you for a long time and that’s why picking something that is going to go the long haul for you on style and  durability is paramount.

Tile Backsplash

If you wished an expert could be with you, holding your hand and guiding you, I may have the next best thing.  The Interior Design Tile Style Guide from Drury Design will help you understand everything you need to know when making a tile purchase. From the basics of whether  to choose glass, ceramic, porcelain, natural stone or exotic tile based on where it will be installed, durability, maintenance and your budget to lots of interior design ideas simple and ornate. Armed with the proper knowledge beforehand makes picking out tile a much easier and pleasurable task.

Tile Steamer_in_kitchen_drury

Tile Steamer_in_kitchen_drury

You can browse great design ideas for bathrooms, kitchens, backsplash trends and more for inspiration.  Check it out today and see what you think.  Let us know your thoughts.


1 Comment

Filed under Curb Appeal, DIY, Home Improvement, Main Page Post, Mommy Ramblings, Shopping

Master Bath Reno Update Featuring Concealed Cabinets!!! #CurbAppeal

concealed cabinet logo

Have you wondered what part of the master bath ren0 we are up to?   Did you think we were finished and going to do the big reveal?  I wish we were finished.  We have so many home improvement projects occurring simultaneously in our home right now, it feels like we are living in an episode of Hoarders.  What I mean by that is, since we had to empty rooms and closets, we are now storing so much in towers of boxes and bins it feels like our stuff is taking over.

Concealed Cabinet image

I cannot wait until the master bath is finished and it almost is but there have been such delays with the tile contractor and things have been done backwards.  He needs to finish the tiling of the stairs around the whirlpool and grout certain areas and then he still has to finish prepping the walls for paint which is going to get dust over everything again and should have been finished but let’s not even go there!

Anyway, you probably remember posts about the medicine cabinets and how we decided to go with Concealed Cabinets. If you missed that, you can read about it HERE and HERE.  We installed 2 of the extra-large concealed cabinets on either side of the vanity.  It was an easy install and they look great.  Concealed Cabinets  look like a picture frame and you can add whatever art work you like to the door front and change it whenever you want too!

For this review and update, I just put some scrapbook paper in the back of some prints I had.  I am changing them to something that fits the entire space and will be using photographs I took of our lake and gardens.  I tried two different papers with the prints but decided to use the print and changed the one that had the solid green-blue metallic paper. Until, the other prints come in, these will do and it’s just as well since we still have a lot of dust and construction to come.

this was a very stiff metallic paper and it looks very weird in the photo because of the way it reflected the light and it looks like two different colors.  That is not how it looks in real life but I did like the look of the print paper better so changed them.

This was a very stiff metallic paper and it looks very weird in the photo because of the way it reflected the light and it looks like two different colors. That is not how it looks in real life but I did like the look of the print paper better so changed them.


Concealed Cabinet 2

I have not put anything inside yet, since as you can see the walls still have to be finished.


This is the print background that I decided to put in the other as well until the enlarged photo prints come in.

This is the print background that I decided to put in the other as well until the enlarged photo prints come in.


Concealed-Cabinet 5

Concealed Cabinets are made of REAL WOOD, no plastic and come in different sizes and finishes.  We choose the white in the extra-large size. If you are looking for a change from the traditional look of ordinary medicine cabinets, a concealed cabinet could be just what you are looking for.  Right now they are having a SIZZLING SUMMER SALE and you can save 20% at www.concealedcabinet.com.  You can follow Concealed Cabinet on Facebook  and Twitter to see the latest news and updates on their product line.


Stay tuned for more updates and hopefully very soon the big reveal of the Master Bath!!!  I am keeping my fingers and toes crossed that it will not be much longer.

Innovators sponsored our project by providing us with the 2 Concealed Cabinets, as always, my views and words are 100% my own.

1 Comment

Filed under Curb Appeal, Discount Code, DIY, Home Improvement, Main Page Post, Mommy Ramblings

6 Ways to Brighten Up Your Apartment!!!

Although you can’t do any major remodeling when renting an apartment, you don’t have to put up with living in a dark, dreary place. There are all kinds of ways to brighten up even the darkest abode, and there’s no need to spend a fortune to make it happen.

white_flameless_candles

Put These Six Tips to Work to Transform Any Gloomy Apartment

  1. Reflect the Light – If you’re maxed out in the lamp department, have limited amounts of natural light and still want to make things brighter, invest in reflective decor. Mirrors, glass tables and shelves and metal furniture and accent pieces all reflect the light to make it brighter and more dazzling. As an added bonus, mirrors make rooms seem more spacious too.
  2. Ditch Dark Floors and Walls – Light-colored paint works wonders when it comes to brightening up a room. If your lease doesn’t allow you to repaint the walls, invest in light-colored artwork and decals. The same applies to floors. You can’t install new flooring, but adding a few light-colored rugs into the mix should make a major difference.
  3. Get Creative with Pendant Lamps – Again, the terms of your lease may or may not allow it, but installing pendant lamps and hanging them at different heights is a terrific way to add significant amounts of brightness to a room. With bulbs shining at different levels, even the most cramped spaces seem a lot roomier. There are all kinds of beautiful pendant lamps out there too, and brightly colored models pack a major wallop.
  4. Make Windows Look Larger – Installing new windows isn’t an option, of course, but it’s easy to work with what you have. One of the best tricks for making windows look larger is to get creative with curtains. Invest in floor-length curtains, and then hang them so that they precisely flank either end of the window. At a glance, the window will appear much larger than it actually is. While this won’t actually bring more light into your apartment, it will create the illusion of doing so.
  5. Use a Light Touch with Furniture – Large, bulky pieces of furniture increase the darkness of a room. Invest in lightweight chairs, sofas, coffee tables and other types of furniture instead. Seek out items that have sleek, slim profiles, and choose pieces that have lots of open space underneath. Finally, use furniture sparingly in general. The more space there is, the brighter your apartment will seem.
  6. Add Brightness and Visual Interest with Flameless Candles – Regular candles are lovely, but they’re also safety hazards. With flameless candles, you can enjoy the benefits of candlelight without the risk. They come in many shapes, sizes and designs, so finding suitable pieces for your place should be a breeze.

reenergize_a_room_hero

From mirrors to flameless candles, there are all kinds of ways to bring your apartment out of the darkness and into the light. Try one or all of the preceding tips to revamp your place in a big way.


2 Comments

Filed under Curb Appeal, DIY, Home Improvement, Main Page Post, Mommy Ramblings

Master Bath Renovation Update in our Curb Appeal Series!!! #CurbAppeal

Well, it is time for another curb appeal update.  The master bath is slowly coming along. Our tile contractor still has about a week to finish but things are finally shaping up. Tomorrow they are grouting the shower and finishing more walls.  After all the walls are done they will tile the floor, then put the new toilet in, install the tub and we can get the shower panel and frameless doors on, the vanity installed, countertop and sinks, all the trim and the paint.

Here is a look at some of the progress since last time:

master bath


master bath 1


1 Comment

Filed under Curb Appeal, DIY, Home Improvement, Mommy Ramblings, Uncategorized

It’s National Painting Week! For Inspiration, Check Out Some Color & Project Ideas at Sherwin-Williams!!! #SWPaintingWeek

#SWPaintingWeek

Happy National Painting Week!  Are you working on any painting projects?  You know I have a bunch in the works with all the home improvement we are doing.  Next on the list  for me is to pick the paint color for the new master bath and master bedroom projects.  I will update when I make a decision but in the meantime check out Sherwin-Williams helpful tips, color ideas and projects at SWPaintingWeek.com.

#SWPaintingWeek

Sherwin-Williams Color of the Month April 2014

Sherwin-Williams Color of the Month April 2014

#SWPaintingWeek Sherwin-Williams-National-Painting-Week


Leave a Comment

Filed under DIY, Home Improvement, Mommy Ramblings