Tag Archives: recipe

Best Chocolate Whipped Cream In Only 20 Seconds Recipe Tutorial & Giveaway

You all know how much I love my Mealthy Pot, and I have something super exciting to share. Mealthy has done it again! They created another kitchen appliance that has made it easier for me to prep and cook my favorite recipes. The Mealthy HandBlend is an immersion blender that comes with useful accessories to help you blend, chop and whisk  your way to create culinary masterpieces.

Mealthy HandBlend Mixer Giveaway

The Mealthy HandBlend comes with a whisk attachment, blending attachment, chopper bowl, smoothie cup and a recipe booklet. Use the chopper bowl to chop onions, garlic, ginger, nuts, greens, herbs and so much more. Blend up soups right in the pot, make your favorite fruit smoothies, mix up gourmet coffee drinks better than a barista and it even has a Turbo mode to make sure you have the power to get the smoothest blends.

Mealthy HandBlend Mixer Giveaway

I have made my favorite chai lattes with the Handblend and it will be working overtime this week helping me cook and bake for Christmas. One thing I just have to show you is how quick it makes whipped cream, not just any whipped cream, my family’s favorite homemade chocolate whipped cream can be made in about 20 seconds.

Mealthy HandBlend Mixer Giveaway

This chocolate whipped cream is so light and fluffy with a delicious decadent chocolate flavor that you can eat alone as a dessert or use it to top hot chocolate, cakes, use in parfaits and trifle and so much more. It literally tastes like the airiest chocolate mouse you have ever had.

Mealthy HandBlend Mixer Giveaway

Watch this video below and I will unbox the Mealthy and then make up a batch of this delicious chocolate whipped cream before your eyes:

Did you see how easy it was to make that delicious chocolate whipped cream? You have to try it, you will thank me! We added the Mealthy HandBlend to our Holiday Gift Guide at Mommy Ramblings.

There are loads of recipes and videos on the Mealthy Mobile App for iOS and Android. Smoothie Cup and Chopper Bowl are BPA free and you can trust Mealthy to rigorously test their products for safety, giving you peace of mind. 

Giveaway:

Mealthy is sponsoring a giveaway on Mommy Ramblings! One lucky blog reader will win their own Mealthy HandBlend! Thank you to Mealthy for the review HandBlend and for sponsoring this great giveaway on Mommy Ramblings! Open to US residents.

Mealthy HandBlend Immersion Blender Giveaway on Mommy Ramblings Rules:

Enter through the Rafflecopter widget below for your chance to win. Good Luck!!!

Continue reading


25 Comments

Filed under Cooking, Giveaway, Holiday Gift Guide, Recipes

Vietnamese Beef Stew (Thit Bo Kho) Recipe

Vietnamese cuisine is well-known for its utilization of fresh ingredients, an emphasis on meat and vegetables, as well as its flavorful use of seasonings. You will often find herbs and seasonings such as lemongrass, cinnamon, ginger, and bay leaves in Vietnamese dishes.

For all of these reasons, Thit Bo Kho or Vietnamese Beef Stew is a perfect example of Vietnamese cuisine. Tender beef braised in cinnamon and stewed in a mix of vegetables and seasonings until it is ready to be served with a crisp toasted baguette.

The total meal prep time is roughly 30 minutes. Beyond prep, you need to account for 4 to 24 hours of marinating time, and 1.5 hours for stewing.

Our recommendation is to prep the meat mixture for marinatimg the night before you plan to cook the stew. Then let the mixture sit overnight in your refrigerator. This makes this recipe a great meal for families looking for a quick prepared fix during the week.

Ingredients

  • 2 pounds stew meat, cut into 1-inch pieces
  • 1 onion, chopped
  • 4 pieces of ginger
  • 3 cloves garlic, minced
  • 2 tablespoons oyster sauce
  • 2 tablespoons sugar
  • 2 tablespoons olive oil
  • 3 whole Burma Spice Star Anise
  • 2 sticks of Burma Spice’s Ceylon Cinnamon
  • 1 tablespoon of crushed lemongrass paste
  • 1/4 cup tomato paste
  • 4 cups of organic beef broth (used as needed)
  • 2 Burma Spice Mediterranean Bay Leaves
  • 2 tablespoons soy sauce
  • 4 carrots, sliced ½-inch-thick
  • Chopped green onions
  • Cilantro
  • Toasted French baguette

The stars of the show

As with all Vietnamese cooking, the key to the flavors of the meal are the spices. Luckily for you, Burma Spice just happens to have the best trio to make your THIT BO KHO a smashing success.

Directions

Step 1

Add cut beef cubes, onions, ginger, garlic, oyster sauce, sugar, cinnamon, and star anise into a mixing bowl. Mix thoroughly, coating the beef thoroughly with the oyster sauce.

Step 2

Place the mixture in a large sealable plastic bag. Marinate in the refrigerator for 4 to 24 hours. As previously noted, Steps 1 and 2 are perfect for meal prep the night before you plan to serve the dish.

Step 3

Heat oil over medium-high heat in a large heavy pot or Dutch oven. Toast the Burma Spice Star Anise and Burma Spice Ceylon Cinnamon sticks for about 30 seconds. Be careful not to burn these ingredients. Simply brown until that amazingly fragrant smell hits you, and take off the heat. You will add these items back into the mixture once you are ready to simmer the stew.

Step 4

Brown the marinated beef mixture in batches.  As you brown it mix in some of your crushed lemongrass paste with each batch. If you put the entire mixture into the dutch oven at one time the amount of liquid produced will keep your meat from browning. You likely want to divide your mixture into 4 batches. Put each batch into a large bowl and move to brown the next.

Step 5

Stir in tomato paste to coat your beef mixture thoroughly.

Step 6

Add beef broth to your mixture. You just want to cover your beef, so add the broth slowly. Add your bay leaves, soy sauce, toasted ceylon cinnamon sticks, and star anise into the stew.

Step 7

Bring the stew to a boil. Reduce heat to a simmer and cook for 1 and 1/2 hours or until beef is tender.

Step 8

Add your cut carrots during the last 15 minutes of cooking time. Simply cook until the carrots are tender.

Step 9

Top with green onions and cilantro. Toast your baguette and serve! This recipe is a great meal for any day. It is a tender, flavorful dish that will have your family asking for more.

This is a collaborative guest recipe post.


3 Comments

Filed under Cooking, Home & Garden, Recipes

Make A Carvel Style Ice Cream Cake at Home

When I was growing up, birthdays were always celebrated with ice cream cakes. Most of the time they came from Carvel but sometimes, my parents picked one up  at Dairy Queen. Our Dairy Queen used real cake in their ice cream cakes. I did not care for them as much as the Carvel cakes with the chocolate crunchy layer. I did like the fudge that was in the Dairy Queen cakes though.

With my own family, ice cream cakes are still highly requested for birthday cakes. I love to bake and make many different kinds of cakes, but had never attempted an ice cream cake. That changed a couple of weeks ago when I made my first ice cream cake. I choose to make one in the Carvel style, but enhanced the chocolate crunchy layer with a layer of fudge. 

I was surprised at how well the cake came out. I did have one issue, but it was easily solved.  I needed to stabilize my whipping cream, so that it could be piped onto the cake. It is very easy to do and I choose to do it by adding 2 teaspoons of Wilton Clear Piping Gel that I had on hand. It turned out fabulous. The next time I make it, I am going to use the stabilized whipped cream on the entire cake. There are also recipes for stabilized whipped cream using gelatin.

One of the reasons I like making my own ice cream cakes is because, I can customize them to our tastes using different flavors and non-GMO ice cream.  I am thinking a caramel layer may be a nice option as well. Even using a high quality ice cream, the cake we made cost much less than buying a  Carvel cake in the store. The prices of those cakes has increased dramatically over the years.

Making your own ice cream cake at home is not hard, but it does take time. You could make it in one day if you start early, but you are better off making it over 2 days. To start, freeze a 9″ springform pan.  There are some different ways you can use the pan. This first time, I used it with the bottom attached, but for my next cake I plan to use a 12″ lace doily cake circle. You can put the cake circle on a cookie sheet with the ring on top.

The trick is to not let your ice cream soften too much if you use this method. It works best if you keep the ice cream as firm as possible while still being spreadable. I have also seen people who make it directly on a silicone lined baking sheep with the ring.  I will update on how the cake circle method goes, and if I find it better than leaving the bottom attached.

I made a video tutorial of the process you can view below:

I picked up 2 containers of Breyer’s Non-GMO ice cream in chocolate and natural vanilla. I used chocolate on the bottom. After spreading it out in the pan, I let it freeze until firm.

Then I opened a package of regular OREO cookies and removed the cream from about 2 rows of cookies. I took the chocolate cookies and placed them in a zippered plastic bag and then crushed them coarsely with my rolling-pin.

I bought Hershey’s hot fudge topping and spread that on the frozen chocolate ice cream layer.

Then, I added the crumbled chocolate OREO cookies on top. I put the cake back in the freezer to freeze a bit while the vanilla ice cream was on the counter softening up. When the ice cream reached a spreadable consistency, I spread it out on the cake. It looked like there was not enough room to add all the vanilla ice cream.  I was surprised that I was able to add it all besides a tiny bit, I promised to save for my youngest son. With the vanilla ice cream spread evenly, I put the cake back in the freezer to set.

For the outer layer, I whipped up a quart of heavy whipping cream  with 2 teaspoons of pure vanilla extract and 1/2 cup of confectioner’s sugar. As I said above, I would use the stabilized whipping cream on the entire cake next time. To make that version, you whip the cream, vanilla and sugar until soft peaks form, and then add in 2 teaspoons of Wilton clear piping gel, and beat until stiff peaks form. Be careful not to overbeat your cream.

It was not difficult to remove the ring from the cake. I used a hot cloth, and loosened the cake with a butter knife and the ring popped off.

I added the cream to the cake and sprinkled the top with rainbow-colored sprinkles. Then, back in the freezer for the cream to harden.

The last step was applying the stabilized whipping cream to the top and bottom using a open star tip and a disposable piping bag

With the piping of the cream finished, I put the cake back in the freezer until we were ready to celebrate. Everyone loved the ice cream cake and raved about how good the fudge and chocolate crumbled cookie layer was. I will definitely be making our own ice cream cakes from now on.

Let me know what you think, and if you have made an ice cream cake in the comments. I would also like to know if you try this recipe, and how it turns out for you.


8 Comments

Filed under Baking, Cooking, Home & Garden

Easy Marshmallow Fondant Recipe & Video Tutorial

I have shown you before how to make easy marshmallow fondant, but this time I created a video tutorial as well. I am a very visual person and love being able to watch video tutorials. They help me immensely, so I decided to try to do as many as I can to help others.

Marshmallow fondant is very inexpensive to make and taste so much better than the premade fondant you can buy in the store. To make this marshmallow fondant, you will need:

You can watch the video tutorial below:

The thing I like about this fondant is that when you use your stand mixer, you can add enough powdered sugar so that it is fairly easy to knead right out of the bowl. It comes together into a workable fondant very quickly.

It is also very easy to color this fondant with gel food coloring. I have another video that shows how easy you can color this marshmallow fondant.  Please subscribe to our YouTube Channel so that you will know when it is live.

Let me know if you try this recipe, and how it worked out for you.


5 Comments

Filed under Baking, Cooking

Italian Ricotta Cookies – Full Recipe and Video Tutorial

If you are looking for a tender, cake-like cookie that is not too sweet, but has a delightful lemon flavor that makes it perfect to pair with coffee or tea, this Italian Ricotta Cookie recipe will be one you want to try. These cookies are always a hit at our house. I even made 2 batches during Christmas in order to have some for my daughter to take back with her.

They are such a festive looking cookie to bake during Christmas and New Year’s, but you can make them any time of year. If you want, you can tint the icing with food coloring.  Some people like to tint it red or green for Christmas. You could tint it pink or blue for baby showers or gender reveal parties as well. I prefer white and just change the colors of the nonpareils or sugar sprinkles I use if I want to make them a bit different.


It is very important to use whole milk ricotta when baking these cookies, part skim does not taste the same. Also, be sure to cool the cookies on cooling racks before icing them. Never frost a hot or warm cookie. The recipe says to chill the dough, but if you are pressed for time, I have made them without chilling the dough and they came out fine.

Italian Ricotta Cookies

Ingredients

  • Ingredients For Dough
  • I cup of softened butter
  • 2 cups of sugar
  • 1 ¾ cups (15 oz) of whole milk ricotta cheese
  • Finely grated zest of 1 lemon
  • 2-1/2 tsp of pure vanilla extract
  • 2 large eggs
  • 4 cups of flour
  • 2 tsp of baking soda
  • 3/4 tsp of sea salt
  • Ingredients For Icing
  • 1 tbs of melted butter
  • 1-1/2 tsp of pure vanilla extract
  • 4 cups of confectioners’ sugar
  • Juice of one lemon
  • 1/4 to 1/2 cup of milk (use as needed to think icing to correct consistency)

Instructions

  1. Cream the 2 sticks of butter with sugar until fluffy with electric mixer. Add ricotta, lemon zest, vanilla extract and mix well. Add in eggs, one at a time. Scrape sides of bowl and then begin to slowly mix in flour, one cup at a time. Add baking soda and salt and mix until blended. If you want you can chill dough for several hours or overnight. You can also bake immediately.
  2. Scoop with a cookie scoop and place about 2" apart onto a non-stick baking sheet liner or parchment paper. Bake cookies at 350 degrees F. for 15 minutes or until golden brown on the bottom. Remove cookies and let cool on wire rack.
  3. To make icing, melt 1 tablespoon of butter and whisk into the confectioners sugar with lemon juice, add enough milk to make a spreadable icing. Using an offset spatula or butter knife, spread icing onto top of cookies and sprinkle with sprinkles, nonpareils, decorative sugar or other decors. Let cookies set until icing is hard.
https://www.mommyramblings.org/2017/12/29/italian-ricotta-cookies-full-recipe-and-video-tutorial/

Watch my complete baking tutorial video for these cookies below.


Please let me know if you try them and what you think.

112 Comments

Filed under Baking, Cooking

Easy and Delicious Mini Cheesecake Recipe

I have been making these mini cheesecakes for my family for over 20 years. If I didn’t make them, my kids would be crushed, because it is one of my traditional dessert recipes that I bake for Thanksgiving, Christmas Eve, Christmas Day, New Years Eve, New Years Day, Easter and other special occasions.

They are very easy to make, and they are such a hit because you can top them several different ways which makes them even more appealing. If you are looking for a mini cheesecake recipe that is easy and delicious, you found it! This tried and true recipe is posted for you below.


This recipe is supposed to make 18 mini cheesecakes, but there is always enough filling for a few more, so I add the crumb mixture to 3 or 4 additional, lined muffin cups. I hope you give this recipe a try,  I think you will really like them.

Mini Cheesecakes

Mini Cheesecakes

Mini Cheesecakes

Ingredients

  • • 1-1/2 Cups of Graham Cracker Crumbs
  • • 5 Tbsp. Melted Butter
  • • 3 Softened 8 Ounce Packages of Softened PHILADELPHIA Cream Cheese
  • • 3/4 Cup of Sugar
  • • 2 Tsp. of Pure Vanilla Extract
  • • Zest of 1 Fresh Lemon
  • • Fresh Lemon Juice (I use the juice from ½ of the lemon)
  • • 3 Large Eggs

Instructions

  1. Preheat oven to 325°F.
  2. Mix graham cracker crumbs and butter; press evenly onto bottoms of 18 lined muffin cups. I always have enough mixture for more than 18 cheesecakes so I put the mixture into at least 21 lined muffin cups. Put these into the oven for 5 minutes or until lightly golden brown.
  3. Raise oven temperature to 350°F.
  4. Beat cream cheese, sugar, vanilla, lemon zest and lemon juice in large bowl with mixer until well blended. Add eggs, 1 at a time, mixing on low speed after each just until blended. Fill your muffin cups about 3/4 of the way with this mixture.
  5. Bake 20 min. or until center is almost set. Cool completely. Refrigerate 3 hours.
  6. Before Serving top each cheesecake with about a tablespoon of the pie topping. You could also top with whipped cream and fresh berries, fruit preserves or jam.
https://www.mommyramblings.org/2017/12/27/mini-cheesecake-recipe/


Let me know what you think if you try this recipe.


12 Comments

Filed under Baking, Cooking, Home & Garden, Recipes

How To Make Marshmallow Fondant & Decorate A Cake With It!

This shop has been compensated by Collective Bias, Inc. and its advertiser. All opinions are mine alone. #MinionsMovieNight #CollectiveBias

minions movie watching collage

What was your family’s favorite movie from last summer?  If you are like us, it was  Minions © 2015 Universal Studios-all rights reserved . If you loved the movie like we did, then it’s time to celebrate, because Minions is coming to Blu-ray/DVD at Target on Tuesday, December 8th! We are super excited for this release and we are really ready to celebrate minion style.

If you want to celebrate with a great family movie night, Target is a perfect one-stop-shop for every thing you need to have an award-winning night! If you can’t wait, you can pre-order Minions online at Target and if you do, you will get a $5 Target gift card.  The Minions Metalpak Blu-ray/DVD-Deluxe is only available at Target and has 40 minutes of exclusive content! Pre-ordering is easy, just order online and pick it up at the store!

minions metalpak plain


You really get a great deal when you order the Target exclusive Minions Metalpak Blu-ray/DVD because you get bonus content not available anywhere else. You get a minions Party Planner that will help you create some fun party flair inspired by the minion movie. Have the perfect party with mask invitations, balloons, banners, cup sleeves and goody bags. Every party has to have yummy treats and recipes for frozen bananas, munch, cupcakes, cookies and cake pops are included. On to fun and games with a Pinata and Pin the Goggles. Finally get creative with balloons and bracelet arts and crafts!

We wanted to make something really special to show how excited we are for the Minions movie release. We decided to make a minions cake. In doing so we made our own marshmallow fondant for the first time. I was a little nervous before we started but found it was very easy and taste so much better than store-bought fondant. I was in Target recently and picked up their Market Pantry Powdered Sugar to use in our marshmallow fondant recipe.

market pantry sugar

My husband was a huge help and we had a great time doing this together. In case you want to try it, just follow the step by step tutorial below.

PicMonkey Collage minion cake hero

The ingredients you need to make the fondant are one 16 ounce package of mini-marshmallows, 2 Tbsp. of water, 2 pounds of confectioner’s sugar and some vegetable shortening for your hands and work surface. Our counters are quartz and they are excellent for rolling and kneading directly on. Find out if your surfaces are suitable or use a board.

ingredients

Place the marshmallows in a microwave safe bowl and put the 2 Tbsp. of water over them. Toss a little bit and put in the microwave for 30 seconds, remove and stir. You will see little change after 30 seconds but it is important to work in 30 second increments.

Marshmallow Fondant

Mashmallow 2

Marshmallow first 30

You will keep repeating the process of microwaving and then stirring the marshmallows until they are all melted with no lumps.

marshmallow fondant stir

Marshmallow fondant keep cooking

Marshmallow fondant cook

Marshmallow Fondant stirring

Next you will add in your confectioner’s sugar a little bit at a time. When you have a consistency that is hard to stir in the bowl you will turn it out onto your work surface you have coated with vegetable shortening. You will also need to coat your hands.

Marshmallow Fondant Crisco

fondant sugar 3

Fondant Sugar Knead

Next you will knead the fondant and get it blended together with the sugar, you will need to add more sugar until you can stretch it for about 2 inches before it breaks.

marshamallow fondant 22

marshmallow fondant kneading

Marshmallow Fondant kneading 2

Fondant Sugar 4

After you have kneaded it to the right consistency you need to wrap in plastic wrap and let it rest in the refrigerator at least 12 hours.

Fondant Away

In the meantime, I used a yellow cake mix to make two 9″ round cake layers.

cakes

cake mix cakes out

cake mix bake

cakes out 2

Next, we need to make the buttercream chocolate frosting. So you will need 2 sticks of butter, I let my soften at room temperature. You will also need 4 cups of confectioner’s sugar, 3/4 cup of good cocoa powder, 2 tsp. of pure vanilla extract, and 2 tbsp. of milk. You mix all of the frosting ingredients except the milk in a mixer and add the milk a little bit at a time to get to the desired consistency.

butter

butercream

buttercream 1

butterceam

buttercream 6

When the layers have cooled, you are going to frost the cake as you would for a regular layer cake.  Level the layers so your cake is as even as possible. Keep the frosting as smooth as you can. You can store the cake in the refrigerator to allow it to crust.

cake level

buttercream 7

cake frost

cake frost 1

Cake frost 2

When your fondant has been chilled enough, take it out and plan your colors. I needed a little white, a little blue, a little gray, a little black and a lot of yellow. So I cut small pieces and left the largest piece for the yellow. I have learned that the best kinds of colors that mix easily and completely are gel colors.

fondant

We happened to have a minions cutter that was made for sandwiches that worked well for the eyes and goggles. If you do not have something like this you can use round cookie cutters and improvise.  We cut out the white eyes first.

fondant 3

Then we did the gray goggles. You color the fondant by adding a little bit of gel color and folding the fondant on top of the gel and kneading it until well blended. The gel color works best and I saw that first hand because we used it for every thing but the blue. The blue was a lot harder to color and did not blend as well using traditional liquid food coloring.

fondant 5

Fondant 6

We made black and I shaped some hair, my husband shaped the eyeballs and I did the mouth. Then on to the yellow. My husband was a real help in all this and did most of the fondant work while I took the pictures. To get the right amount of fondant to cover the cake, you need to measure across your cake and then the height of each side. The total will be how large your fondant will need to be.

fondant 7

fondant 9

fondant 8

fondant 10

fondant 11

When it was rolled to the right consistency we brushed a little water on the top and sides of the cake using a pastry brush. This helps the fondant stick and not slip.

fondant 14

Next, drape the fondant in half over your rolling-pin.  Then carefully place it on top of the cake.  You smooth the top and as you go down the sides you don’t press down but up slightly and work to just smooth it all over your cake. When you have it smooth without wrinkles, you want to trim the bottom with a small pastry wheel or pizza cutter.  You can dust off the powdered sugar and then put the final fondant pieces on your cake. If you wet the back of them, it will help them stick.

fondant 15

fondant 16

fondant 17

fondant 18

fondant 20

fondant 21

Lastly sit back and enjoy your minion cake before you cut into him to have something sweet to eat while you watch the movie. We felt bad cutting him, especially my 6 year old but in the end we knew we needed to. Everyone enjoyed our tasty minion cake.

minion cake

minion cake 1

minion cake 4

minion cake 5


If you really want to have some fun with a lot of other Illumination Entertainment’s Minions movie fans there is a Twitter viewing part on December 11th from 7-9pm EST! You can RSVP at www.SoFabChats.com and follow along with the #MinionsMovieNight on Twitter!

Please let me know if you try this, I would love to hear how it comes out.


3 Comments

Filed under Baking, Cooking, Family Fun, Kitchen, Recipes, Shoppertunity

The Secret of Great Fried Food Without the Fat or Calories

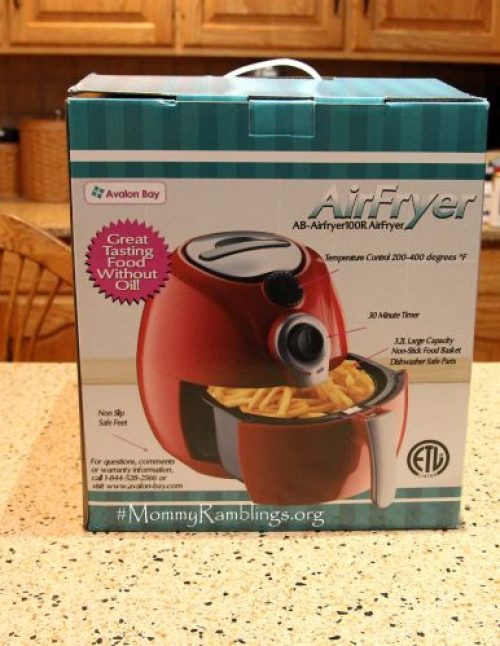
Do you love the taste of homemade thick cut french fried potatoes, fried chicken, mozzarella sticks, friend zucchini and more but don’t like the fat, greasy mess and calories?  If so, you are going to love the Avalon Bay AB-Airfryer100.  This sleek Airfryer uses Rapid Air Circulation Technology which circulates hot air with speed and precision for perfect results. Fry, Bake, Grill or Roast your food for you and your family. Its time you experienced this revolutionary way to cook your food. Dont Fry Your Food, AirFry Your Food. ab-airfryer100r-ls1-l

This appliance is like a Mini Convection Oven. AirFryers work the same way as convection ovens, but better. The fan technology removes the fats & oils from the food, by allowing it to drip through the drip basket. It then AirFrys the food by lifting the oil and making your food airborne by coating it. It does this continuously throughout the cooking process. The result is, you don’t need to use oil. Meaning less waste, fewer calories and less guilt.

airfryer red counter

The Air Fryer uses a combination of high-speed circulation, which makes the hot air rapidly circulate within the AirFryer. All the ingredients within the non-stick food basket will be heated at once, as the heat will come in through all sides. This guarantees that with the Avalon Bay Airfryer your food will be cooked evenly due to the optimal heat distribution. The 30 minute timer lets you customize the settings to cook your favorite foods the way you want.  The AirFryer turns itself off when your food is cooked and the timer dings. The AirFryer has a fully adjustable temperature range from  200-400°F.

Avalon Bay Airfryer

Features:

  • Rapid Air Circulation Technology which circulates hot air with speed and precision for perfect results
  • Mesh metal basket helps provide extra crispy results.
  • Safety Element: 30 minute timer
  • Hassle free clean up with dishwasher safe parts
  • Stainless steel 304 heating element

Avalon Bay Red AirFryer
With the Avalon Bay AB-AIRFRYER100 you have so many choices when it comes to cooking or reheating food for your family. The 3.2L mesh metal basket has a quick release allowing you to easily remove it. This striking red shaded AirFryer from Avalon Bay has a compact design and a stainless steel 304 heating element. The non slip feet, you can be rest assured that it will stay in place and not slip off your bench top. A unique feature on this appliance, is its top handle, which is great for carrying and storing away conveniently. For a quick clean-up this Air Fryer does come with some dishwasher safe parts.airfryer 100 red

What We Love:

We love this AirFryer because it is so sleek and secure, it does not move when cooking and with kids we do not have a safety issue.  When you fry in the conventional way, it is messy and dangerous. You can not leave the frying foods unattended and there is always the risk of splattering oil burning the person preparing the food or someone nearby. Oh and you know what is amazing, you can even bake a cake in it! It’s great to have the food we love without the calories of conventional frying.  If you want to try eating healthier the Avalon AirFryer is a great way to get the taste you love without the mess or calories you hate.

French Fries Avalon Bay

See our video review below to see how we made the thick cut fries pictured above:

Thick Cut Fries:

Five or Six Large Potatoes

1.5 Tbs of Extra Virgin Olive Oil

Sea Salt/Pepper To Taste

This is such and easy recipe, just peel the potatoes and cut into thick homestyle fries. Put the fries in the basket and coat with extra virgin olive oil. Cook in the AirFryer for 10 minutes. Take out basket shake and return to fryer to cook 10 more minutes.  Remove fries to plate and season to taste with sea salt and pepper.


Do you have an AirFryer?  If so let me know in the comments. If you have any questions feel free to post them in the comments as well.  I look forward to reading your comments and questions.  Follow Avalon Bay on Facebook.


Leave a Comment

Filed under Cooking, Kitchen, Recipes, Review

Grilled Peanut Butter, Banana & Honey Waffle Breakfast Sandwiches With Aunt Jemima Frozen Waffles!!! #4MoreWaffles

This shop has been compensated by Collective Bias, Inc. and its advertiser. All opinions are mine alone. #collectivebias

I always think that the plan of getting up 20 minutes earlier in the morning will make getting the kids out the door less hurried and subsequently less stressful.  It makes perfect sense at night and I totally agree and would offer the advice to anyone.  However, when that alarm goes off and I am feeling particularly sleepy, knowing that I have the extra minutes can make me hit the snooze alarm a few times.  Now at the time, I think those extra minutes are so worth it, but when we are scurrying about trying to get everyone dressed and out to the bus stop in time and someone can’t find something they need, it hardly seems worth it.

I want my kids to not be stressed in the morning, so we make sure that we have everything ready to go the night before and that helps.  You know what else helps?  Having breakfast choices that are fast and easy.  That is why I keep Aunt Jemima Frozen Waffles in our freezer.  The resealable packs now come with  14 waffles instead of 10! Yeah for 4 more waffles and the resealable bag makes it easy to take what you need, leaving the rest sealed for freshness.

waffles 2_edited-1

I buy mine from my local Shop Rite and they come in 4 different varieties; Homestyle, Buttermilk, Low Fat and Blueberry.  They are conveniently located in the frozen food aisle.

#4morewaffles-#collectivebias-Aunt-Jemima-Breakfast-#shop


#4morewaffles-#collectivebias-Aunt-Jemima-Breakfast-#shop

#4morewaffles-#collectivebias-Aunt-Jemima-Breakfast-#shop

My kids love waffles and these can be heated in the toaster which makes breakfast on the go a breeze.  We usually just toast and serve with syrup,  fruit or fruit and yogurt on the side on school days.  However on weekends, we can go all out and cook sausage, eggs with cheese, Canadian bacon and of course have fruit and yogurt too.  A really special recipe for Grilled Peanut Butter, Banana & Honey Waffle Sandwiches is below!


#4morewaffles-#collectivebias-Aunt-Jemima-Breakfast-#shop

#4morewaffles-#collectivebias-Aunt-Jemima-Breakfast-#shop

#4morewaffles-#collectivebias-Aunt-Jemima-Breakfast-#shop

#4morewaffles-#collectivebias-Aunt-Jemima-Breakfast-#shop

#4morewaffles-#collectivebias-Aunt-Jemima-Breakfast-#shop

waffles 7_edited-1

My kids love a waffle sandwich that is made with 2 Aunt Jemima Waffles fresh from the toaster and with scrambled eggs with cheddar cheese, topped with Canadian bacon or pork roll and topped with another waffle.  They also like the waffles with syrup and a side of sausage.  So many great ways to eat them, you can use your imagination and indulge your taste buds.  As for me I’m glad I have something in the freezer that makes breakfast fast and satisfying for my kids.  Aunt Jemima helps me have one less thing to worry about on busy mornings and gives us something special to look forward to on weekend mornings.

Recipe Idea:

I want to share another way to serve Aunt Jemima Waffles that is super yummy!  What you need is 1/2  banana cut in slices, about 1.5 Tbsp of Peanut butter, 1 Tsp of honey and 2 Aunt Jemima Waffles of your choice.

#4morewaffles-#collectivebias-Aunt-Jemima-Breakfast-#shop

Toast the waffles and then spread the peanut butter on both waffles, top one side with the honey and the other side with sliced bananas.

#4morewaffles-#collectivebias-Aunt-Jemima-Breakfast-#shop

#4morewaffles-#collectivebias-Aunt-Jemima-Breakfast-#shop

#4morewaffles-#collectivebias-Aunt-Jemima-Breakfast-#shop

Put it together and grill it lightly in a pan with a little butter.  After grilling both sides remove, cut and enjoy!

#4morewaffles-#collectivebias-Aunt-Jemima-Breakfast-#shop

#collectivebias-#shop-#4MoreWaffles!

You know, the fact that I could have one of these yummy grilled peanut butter, banana & honey waffle breakfast sandwiches may just be the inspiration I need not to press that snooze button.  What do you think?  You can save  right now when you purchase with a coupon for $1.00 off your purchase of Aunt Jemima Frozen Waffles.  Click HERE to print your coupon. Let me know if you try them or any of the ideas in this post. #4MoreWaffles

Follow SoFabConnect’s board Aunt Jemima Frozen Waffles on Pinterest.

Aunt-Jemima-Waffle-Coupon-#4MoreWaffles-#cbias-


4 Comments

Filed under Cooking, Main Page Post, Mommy Ramblings, Recipes, Shopping